Showing posts with label refurbishing tools. Show all posts

Sunday, October 4, 2009

A Forgotten Project Gets Remembered...

A few months ago, before I started the whole basement shop rebuild, I'd started working on a fixing up an old egg beater drill I found at an estate sale for $3. It isn't quite as good a quality as my other hand drills - it does have a rosewood handle on the turning gear, but the main grip is a gold-colored metal (though it does unscrew to allow for drill bit storage) - but it didn't look to be in too bad a shape and I figured I could clean it up and give it a way to another woodworker who might need it.

Well, I'd started on it back then but got distracted with something or another and forgot about it. This evening, I stumbled across it again as I was sorting through some tools to start thinning some chisels from the collection and decided to take a half hour to finish it up.

Unfortunately, I didn't remember to take any pictures of the first part of the process, which was to remove the chuck, disassemble it, and clean up the three jaws. They had about a hundred years of grime, gunk, and build-up in them and the action wasn't as smooth as it should be. The only caution I would mention with this part is to wrap something around your vice clamps or pliers to make sure you don't mar any parts of the chuck when you disassemble it. Oh, and remember to unscrew it the right way - lefty-tighty, righty-loosy in this case.

Once the chuck was disassembled, I took a small dowel rod, wrapped some green scouring pad around it, sprayed it with WD-40 and scrubbed the inside of the chuck assembly with it. Then I took some 600 grit wet/dry sandpaper and cleaned up the three jaws. I re-greased the inside of the chuck with some lithium grease and then re-assembled it.

The next step was to disassemble the rest of the drill. This one came apart quite easily - one screw removed the handle and one screw removed the little tab that holds the main gear in place. After it was disassembled, I got out an old toothbrush and some low-odor mineral spirits and started scrubbing everything down. I went after some of the tougher spots with the green scouring pad.

After a bit of work, alternating between the green pad and the old toothbrush, I could see more detailed information about the drill. (Forgive my lack of macro pictures - the new camera doesn't have very good macro capability.) I found two marks of interest. On the chuck, I found a patent date of 1895. On the handle, I found an image of an oak leaf with the words, "WmEnder Oak Leaf" inscribed inside it.

A little internet searching turned up a small amount of information on William Ender. He worked for Simmons Hardware Co., a St. Louis-based hardware company(looks like this drill hasn't traveled very far). You might be more familiar with Simmons' Keen Kutter line of products. Ender was a V.P. in the company and developed his own line of products under the Oak Leaf name. I found an old court document in my search where William was listed as a witness in a legal action Simmons had against the city of St. Louis in 1917, so this drill probably dates to somewhere around that time. I say this because once he left Simmons, he marketed his tools under the Ender product name and not Oak Leaf.

Anyway... I continued scrubbing the drill with the toothbrush, making sure to clean up the teeth on the gear. Here you can see part of the drill sitting on a distant cousin of Chris Schwarz's affectioned "Woobie". I've only ever used this red rag in the process of cleaning old tools, however, so I'm not sure I would want to wipe down one of my hand planes with it before I put it away. After removing a lot of dirt and gunk, I was down to bare metal in several places. Maybe I'll take the time later to more aggressively scrub it and apply a new coat of paint, but for now a good cleaning was enough.

I put a bit of grease back in the hole where the gear spins, threaded the chuck back on, screwed the tab and handle back on and chucked in a drill bit to give it a test. The action on the chuck is a lot smoother now and the drill spins very easily. A test hole in a scrap of mahogany provides evidence of its function.

This was a quick, easy repair project and a fun way to take $3 and turn it into something very useable in the shop. Breathing life back into an old tool is also a great way of "going green", if you're into that sort of thing.

After a bit of pondering, I probably will take the time to disassemble the drill again, scrub it down even more and repaint it a gloss black (the original color, per the remaining paint I can see) and then give it away to someone. If I actually do follow through with that idea, I'll be sure to post a comparrison picture or two.

Monday, April 14, 2008

The power of the written word...

Last week, a new smoother found its way to my shop. It will be my sixth workable (I have one or two part-out planes laying about) plane, but being a Bedrock 604 1/2, it currently holds the limelight on my bench. Hopefully, I'll be able to tune it up into a wonderful user.

It actually didn't look too bad upon arrival. A dusty tumble weed, similar to those my youngest cat leaves on the floors, clung tenaciously to the frog adjuster. A coat of grime covered the bed, lever cap, breaker, and iron. The tote looks to be a replacement (either that, or the previous owner figured out some way of using the plane by only gripping the knob because the tote had a clean finish on it while the knob was quite worn). The sole was quite flat, though it could use with a lapping just to clean off some of the grime.

So why are my aspirations so low? Why would I be content with having this wonderful plane as just a "user"? It's one fault - a small, but stable, crack in the left cheek. The patina of the crack leads me to believe it has been there for quite some time.

Regardless of how long it has been there, the crack prevents it from being a serious collector's plane. That means two things to me...

For starters, it meant I was able to pick up a good usable smoothing plane for not a lot of dough. But the other thing it means is that I don't really have to worry about preserving its appearance or messing up its intrinsic value by "restoring" it incorrectly.

I didn't want to do too much to this plane right off the bat. I disassembled it, wiped down most everything with mineral spirits, removed the sticker residue (from the price tag and the indicator showing the crack in the cheek) and scrubbed off the grime with an old soft bristle toothbrush. Next I broke down the iron and chip breaker to check out their condition. They looked good - nothing a little sandpaper and some more mineral spirits wouldn't fix, though I could tell from looking at the blade that it had never been properly tuned.

After removing any gunk from the knob, I wiped on a few quick coats of garnet shellac to bring it back to life and sanded the top of the brass screw caps in the knob and tote to get them shining.

I decided to leave the sides un-lapped for the time being. I'm not sure how much I want to tempt fate by messing with that crack. I actually have yet to lap the sole, though I plan on doing that in the immediate future. I did, however, work on the blade. I started with flattening the back on my 220 DMT diamond stone. Twenty five minutes later, I was still working on flattening the back! I later determined I was able to save enough of the metal filings to reforge them into a spare blade for my block plane...

After most of 40 minutes, I had the back worked up to the 2000 grit water stone and started working on the bezel. That went much faster.

After a final honing on the king water stone, I assembled the plane and pulled out a small board of mahogany to give it a whirl. I still need to mess with it a bit (as previously mentioned, I do want to clean up the sole just a touch), but with very little effort, I was able to get some nice shavings, as you can see...

So I guess you want to know what I paid for it?

This plane was set down on my door step for $47 delivered. Not a bad little deal, if I do say so myself... Looking forward to putting it to good use.

(And much thanks goes to Chris for the quick and sound advice on picking up a sweet deal when I see one.)

(Even more thanks to Clarence for the sweet deal!)

How did I get such a great deal? I wrote some letters. They weren't long letters, and they weren't fantastically brilliant letters, but they were clearly written and to the point. I sent inquiries out to about ten or so tool dealers, letting them know I was in the market for a good user smoother plane and wanted to know if they had anything available that would be useless to a collector but very useful to someone who wanted to actually use it to smooth wood. A week after I sent those letters out, I got the reply from Clarence about my new 604 1/2.

Not a bad result from five minutes of writing...

Monday, March 17, 2008

A find of not-so-epic proportions...

This past weekend, my wife and I visited my great Aunt Edy over in Illinois. She it truly an amazing woman; she doesn't know the meaning of the word "rest". She normally walks about five miles a day; pretty remarkable for someone in her late 70's. And if she knows she won't be able to walk her required five miles on a particular day, she'll make up for it on the day before!

She was concerned our visit would interfere with her routine, so before we showed up (at an early 8:30 a.m. on the dot, thank you very much), she'd already walked three miles, figuring she could get the other two in after we left.

At some point in time, I'll have to devote a whole entry (or two or three) to Great Aunt Edy...

The purpose of our trip, in addition to the visit, was to make our first (hopefully of many) sojourn to the Belleville Flea Market at the Belle Claire Expo Center. We'd heard a lot of good things about it, and from the way Aunt Edy talked to some of the dealers, she's been there many times before.

It wasn't really how I expected it to be - I guess my expectations of flea markets are disproportionately high... in any case, we had a lot of fun. My wife recently started getting into collecting cut glass and she had a great teacher in Aunt Edy (who has a china cabinet full of it!). She taught us what to look for and the easiest way to check for cracks and when a few minor chips doesn't reduce the value very much at all (when the piece is signed).

I enjoyed the discourse, but was slightly more interested in other wares - hand tools! To be honest with you, I thought the pickings were quite slim, as far as flea markets go. I did find a fairly nice Stanley #5 in good user condition. I chuckled as I disassembled the plane, checking the various parts out for defects - the blade was set bevel-side up!

When I assembled it again, I put it together properly; my OCD would not have it any other way. The handles were crisp and tight and the Victory blade had a lot of life left in it. It wasn't priced terribly high, at $27, and I was sure I could talk him down some, but I thought back to the pre-WWI #5 I have sitting at home, waiting for me to restore it, and I decided to pass. In retrospect, maybe I shouldn't have. I could have fixed it up and given it to my best friend or one of my woodworking friends... I probably won't pass up the next one I find like that.

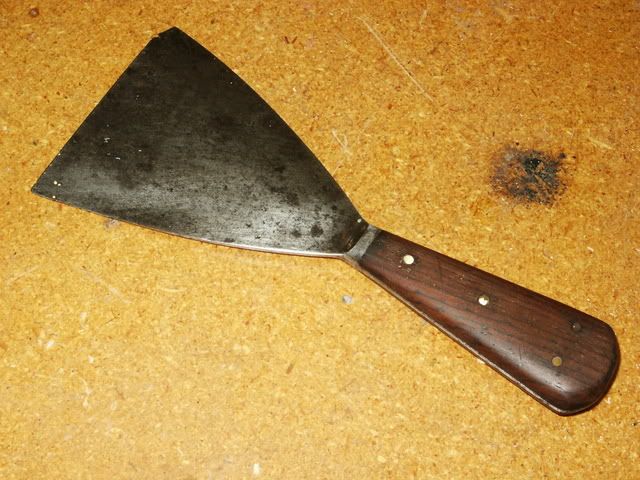
I did not, however, pass on a nice little piece I thought I'd share with you. It was in the $1 box, so I didn't feel right trying to talk them down any. It is a hand tool, but not the usual kind one keeps an eye out for, I suppose. Here's a picture of it in the untouched state...


Not much to look at, is it? Give me a few minutes with some mineral spirits and a green scotchbrite pad, though, and see what you think after that.


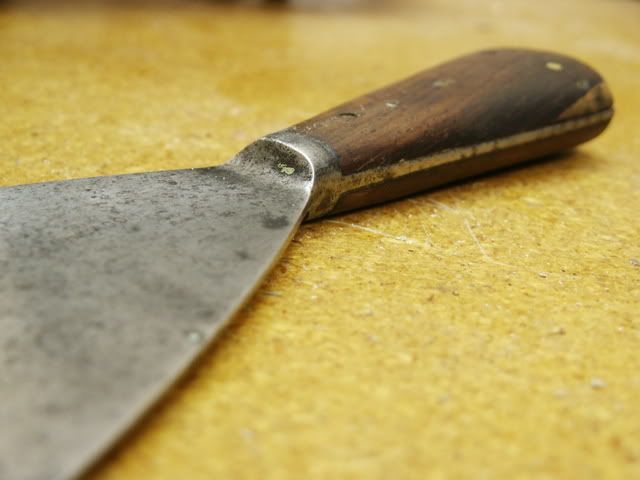
Take a closer look at the handle. That isn't plastic, my dear big-box-shopping-friends! Looks like rosewood to me. And now check out the metal in this close-up.

The blade, the ferrule and the tang are all one piece of metal, riveted to the rosewood handle with brass pins. In this picture, you can also see a small band of sapwood on the end of the handle. It actually has a maker's mark on it, too! It says, " G. L. & CO. CHICAGO" on one side of the blade. Google didn't come up with anything on it, yet, but I'll keep an eye out.

The blade is really thick and hefty; I wonder if I might be able to file a nice clean flat edge on it and sharpen it up like a scraper. I could use it to clean up the insides of boxes or tight corners, maybe? It feels like it could really hold a hook, though.

I'll have to post something about it if and when I give it a try!

Aunt Edy kept apologizing to me; she felt badly that I didn't find anything other than an ordinary paint scraper! I don't know... a rosewood handled paint scraper with an integral tang? It might not be the find of the Century, but in our world of plastic and poor quality, I'd call that anything but ordinary...